| |
|
| Fitting Bachmann couplings to non-Bachmann rolling
stock |
With the cost of some couplings reaching new heights
and more people using Bachmann rolling stock you might
want to convert non-Bachmann stock to Bachmann couplings.
Bachmann couplings are the least expensive around. They
have a moulded in plastic "spring" or centering
piece which fits through two uprights again moulded onto
the Bachmann trucks or bodies. So, if you fit a Bachmann
coupling on any other make it flaps around. To replicate
the uprights and give a support for the spring I use a
small paperclip, the all metal ones are best. I fit it
under thecoupling retaining screw. If you flatten the
narrower end first it will help (hammer on metal vice top
maybe) then bend at 90 degrees about 2/3rds way along.
Measure first to make sure the fitted clip will clear the
axle. Next cut off the larger curved section of the clip.
Unscrew the original coupling and fit the Bachmann one
with your prepared clip under the head of the screw. (Put
the "spring" through the loop first). You might
want to use a thin flat washer as well. Screw the
Bachmann coupling in place and try it's height against
another wagon in your fleet. Repeat for the other bogie
or use this wagon as a converter from Bachmann to another
coupling style. |
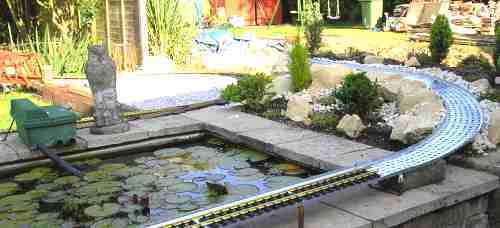
| Using an old coach body (Thanks to
B Ponton)
|
A picture I think explains most of it. The coach
body was a Bachmann Jackson-Sharp, the cat is by
Preisser. The rest is mainly wood. Should fill a corner
of the yard nicely.

|
| Fitting handrails (Thanks to A Anderson)
|
This relates to the new Aristocraft
Class 66 but may help with other new locos. The handrails
come in a separate pack to be added by the new owner.
This involves pressing the ends into holes in the
locomotive body. First check that the hole is clear with
no paint or plastic debris partly closing it. Clear the
holes with a suitable tool like a small Philips driver.
The railings themselves may well be painted and the
problem here is the thickness of the paint makes pressing
them home difficult. They might eventualy go in but the
paint can crack and spoil the look of the part. You can
remove the first few milimeters of paint using a pin
vice. Put the end of the rod in the vice and twirl it,
tightening gradually. This should remove the paint
neaatly without cracking. |
| Adding extra coupling hooks to LGB
rolling stock (Thanks to A Anderson)
|
A lot of LGB rolling stock comes with a
single hook. To make a more secure connection it is a
good idea to have a hook on both ends. You need an extra
hook, plastic spring and split plastic pin (sometimes
supplied). The problem is getting the "half
moon" pin into the hole. The TRICK is to line the
semi-circle up over the one at the side of the hole (with
the hook in place), push and turn through 180?° and it
will pop in perfectly |
| Lighting your buildings, street
lamps and general railway outdoor lighting. |
Now that
solar garden lights are more readily and cheaply
available you have a ready supply of solar cells and
lamps. The idea is to take the units apart, locate the
solar panel on the roof of the building/disguised as a
cold frame/in some other way. You then lead wires into
your bulding and install the light part otr your own
bulbs up to the same voltage. Result, lights every night,
free with no wiring and the need for transformers. |
| Uncoupling LGB rolling stock (Thanks to R. Toleman)
|
Uncoupling
LGB rolling stock can be a difficult exercise
particularly if your stock has double couplings. A simple
gadget can easily be made from thin wire, garden wire or
thin welding rod is ideal. Make a butterfly shape from a
single piece of wire. It should be more than the height
of the highest locomotive you have, maybe about 150-200mm
and around 75mm along the ends. Make the ends meet at the
centre and secure with tape. You then just put the
uncoupler down between the loops on the couplings pushing
down the hooks against the springs, twist a little and
pull your wagons apart. Worth attaching a piece of bright
ribbon to your uncoupler so it won't get lost in the
grass. |
| More on wiring lights/power
supplies |
When wring
lamps maybe in buildings or LGB street lamps,wire them in
parallel in pairs to reduce the voltage in the bulbs.
They will look more realistic and the bulbs will last
longer. Or use your original starter set controller
(everybody has one) to supply a very large number of
bulbs and you can just turn the controller to set the
lights at any brightness you like. |
| LGB
small (4foot diameter) points (thanks to Stephen Watt)
|
It has been
know for some non-LGB rolling stock to have problems
negotiating LGB first radius points. This idea might work
for you. Using some very thin brass fold along the rail
side of the check rail on the curve part of the point.
This tucks down behind the moulding and the idea is to
prevent the opposite wheel riding up onto the plastic V
of the frog. |
There are several tried and tested ways of
laying track in the garden. This is a new one which might
be worth a try.
The trunking is
galvanised and comes in various straight lengths. To form
a curve it can be notched on one side. The raised sides
keep the ballast in place and wires can be attached to
the many slots using cable ties
(Thanks to Dave Baran)
|

|
| Improving Bachmann
Coaches (Thanks
to I Farmer)
|
You might have some of the
latest version of the excellent Bachmann Jackson Sharpe
coaches? The ones with the brass electric pickups for the
lights. The ideal way to improve
these coaches is to fit LGB roller bearing pickup wheels.
However there is a cheaper option
If you look at the bogies you will find
a moulding for plunger style current collectors. LGB
locomotive pickups will fit these mouldings and the
carbon collector will bear on the back of the Bachmann
metal wheels. The brass connectors can be unscrewd and
removed and the wires soldered to the BACK of the
plungers.
This will offer much less resistance
and allow the coaches to run better.
I can supply LGB pickup wheels or
plungers (a packet of 8 will do 2, or at a stretch 4
coaches)
|
| Bachmann Heisler
problem (and maybe other locos) (Thanks to several websites, forums and Bachmann
service department)
|
The Bachmann
G scale Heisler is DCC ready. This means you can add a
digital decoder without a complete rewire of the engine.
Once you have deciphered the Bachmann instructions this
works. But (yes there is a but) this loco is fitted with
a noise suppression circuit in each bogie. This is to
prevent electrical interference. It might do this before
you fit a decoder but as soon as you fit a decoder it
causes the decoder to overheat and stop working. The cure
is: 1. Remove 5 screws and ease
the base plate off
2. Cut the 4 wires to the board ( 2 red
and 2 black)
3 Unscrew the board and remove it.
3 Solder and insulate the wires red to
red and black to black.
4 Replace the baseplate
5 Repeat with the second bogie
Make sure the bogies both run in the
same direction
Apparently this can be a problem with
the Bachmann 0n30 2-8-0 if you don't use a Bachmann
decoder.
It may be the case with other
locomotives as well.
|
| |
|
| |
|
| Maintain your trains A general point worth remebering. Illustrated
here by experience with a Buddy L 2-6-2
(Thanks to Ian Watts)
|
Ian writes: My Buddy 'L' loco has
developed a lot of play in the axle journals/bearings,
most likely due to lack of lubrication. This is due
to totally underestimating two things in garden
railwaying.
First is the loads involved - both from
the self weight of the loco and the weight on the
drawbar.
Second is the distance travelled.
I reckon that, at a conservative estimate, in 8 months of
operation, and only 3 months on the full garden layout,
my locos have each already travelled 4 actual (twelve
inch to the foot) miles!
For the Buddy 'L' loco, with 50 mm (2
inch) driving wheels, that equates to approx 40,000 axle
revolutions. That's what needs lubrication
|
| |
|
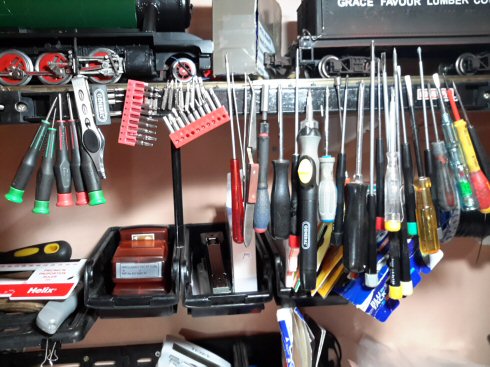
| Store your tools. Look out for
magnetic tool bars. Screw them to the edge of a shelf
above your work bench. Your tools are then within easy
reach
|
 |
| |
|
| ROCO Z21 - Accesssory decoder problem |

|
| |
I have supplied a number of the versatile Z21 DCC
control system made by ROCO. Bu we have found a clitch in
the current firmware. This was using Massoth 4 output
modules but it may well apply to other makes. You set up
you layout diagram using numbers 1-4, 5-8 etc. programmed
into CV32-38. The trick is then to allocate these numbers
to points, signals and other devices with the CV number PLUS
4. So 5 is 9, 6 is 10, 9 is 13 and so on. This
might just save what is left of you hair when your points
won't switch. |
| |
|
| |
|
| |
|